‘Pasta Grannies’ cookbook: From manata and chickpeas to tagliatelle with ragu
After rising to fame on their YouTube channel, the Italians who have spent a lifetime cooking for love have their stories – and recipes – brought together in a cookbook
Sign up to IndyEat's free newsletter for weekly recipes, foodie features and cookbook releases
Get our food and drink newsletter for free
How to make egg pasta dough
The nonna way is to decide on how many eggs you are going to use, and use one handful of flour for every egg. This handful equates to 100g of flour per egg.
Step 1: Weigh out your ingredients
Allow 100g of 00 flour (or plain flour) per person for a main course-sized portion. You need 55g of egg without its shell for every 100g of flour. For example, if you are making pasta for four people, you will need 400g of flour and 220g of egg, which most of the time will mean four hen eggs. But weighing out your ingredients means you can also use other eggs, such as duck or turkey, which is something the nonne do.
If your eggs are on the small side, add a bit of water or another egg yolk to bring the quantity up to the right weight. If your weight is slightly over, use the eggshell to scoop out excess egg white.
Step 2: Mix them together
Tip the flour onto your board in a heap. Use your fingers to make a well in the centre, making sure it’s not too wide or the rim too low, otherwise your egg mix will overflow. Pour the eggs into the well. Take a fork (or use your fingers) and scramble the eggs together. They are mixed sufficiently when you lift the fork and you have a homogeneous, non-clumpy looking liquid that falls smoothly from your fork.
Draw your fork around the inside of the flour wall, so a small quantity of flour falls into the egg mixture. Whisk it in, smooshing any lumps, so you gradually create a batter. Repeat until you have a mixture that won’t run all over the board. At this point, you can cave in the flour walls and mix in the rest of the flour with a bench scraper by scraping the flour inwards and over the batter. Of course, you can beat the egg and flour together in a bowl, even with a food mixer, but it’s not as fun.
Mop up any flour with your dough and give it a quick knead. If it is sticky, add a tablespoon of flour and knead it in. It is better to adjust your dough now than later.
If it is not sticky and you have some flour on the board, scrape off the excess, so you have a nice clean board to knead your dough. Nonne sieve any excess flour and reuse it. The dough should feel soft and pillowy, but not too sticky.
Step 3: Knead the dough
Knead the dough for 10 minutes minimum. Think of your hands as waves: the heels of your hands push the dough away from you, while your fingers pull it back. Once your dough has become a log, turn it 90-degrees and fold in half and continue kneading. You want to work at a brisk pace, as air is the enemy of decent pasta – it will dry it out, so don’t dawdle.
If the pasta feels too dry, damp your hands with water to put moisture back into the dough. Kneading develops the gluten and elasticity of the dough. Your dough should feel silky and smooth. When you press your thumb into the dough, it should bounce back. Some nonne judge their dough to be done when they can see small holes in the dough if sliced through the middle. To knead, you can also use a dough hook on your food mixer.
Step 4: Leave the dough to rest
At this point, place the dough in a lidded bowl and cover it to stop it from drying out. Cling film is good too, but you may not want to use it. You can also use a tea towel, but it’s important it hasn’t been washed with perfumed detergent as this will add an odour to your pasta. Leave the dough at room temperature for 30 minutes. This relaxes the gluten and makes it easier to roll out. You can also leave it in the fridge overnight.
The colour will darken, but it will taste the same. It’s important to bring the pasta back to room temperature before you try rolling it.
Step 5: Roll out the dough
Before you start, remember to keep your pasta floured throughout the process. Cup your hands over your rolling pin so your wrists nearly touch the pasta board. Flatten your dough with your pin, turning it a few degrees at a time in the same direction; this helps to keep it circular.
When it is the size of a plate, start with your hands at hip-width and roll the top third of your dough (furthest away from you) by following the curve of the circle and drawing your hands inwards as you push the pin away from you. Your hands will meet in the middle. Stop the pin before it reaches the very edge. Roll the dough four times. Turn the pasta from 12 to one and repeat going round the clock.
You will end up with a bump of pasta in the middle. To get rid of it, flip the outer edge of pasta over the pin. Hold the pasta with one hand, and place the other hand on the dough to stop it moving. Give the pin a tug with the pasta hand to create a snug fit around the pin. Roll the dough over the pin towards you. Move your hands wider, stick your elbows out and, pressing down, roll the pasta out two or three times. This will flatten the thicker central zone of your pasta. Finish with the pasta rolled up and turn it 90 degrees, opening it out across the board.
Repeat this process until the sfoglia (the pasta sheet) is too large to move comfortably by hand. At this stage, you will need to roll it up around the pin and turn it, as described above. Allow your pin to roll on its own across the dough to remove any air after you have turned it. You can let your sfoglia drape over the edge of the board – allow about a third, no more, otherwise the whole thing will slip off. This helps to anchor and stretch it, but also it means you don’t have to stretch too far over the board, messing up your back. Remember not to lean against the pasta.
Do not attempt to roll the entire sheet (until you feel expert) or change rolling direction; just keep rolling the outer third directly in front of you. As the dough gets bigger, your arms and elbows start quite far apart. Eventually, you will end up with pasta you can see through. It should feel like heavy linen.
To check your pasta is evenly rolled, roll up a third, hold onto the edges (it will fall off the pin otherwise) and hold it up to the light. Darker patches mean thicker dough and you haven’t rolled it uniformly, so you will want to go back over these areas. Leave your pasta sheet to dry on the board for 5 minutes. For tagliolini, tagliatelle and pappardelle, you can now flour it, roll it up very gently (like a carpet) into a log and it’s ready for cutting.
How to make durum wheat dough
Now let’s take a look at durum wheat flour and water-based dough. This dough doesn’t include eggs (usually) as durum wheat already has enough bite. The resulting dough won’t be as stretchy as an egg-based dough made from 00 flour. This type of dough is used for all the pasta shapes you find in southern Italy such as cavatelli and maccheroni and orecchiette. When you make a sfoglia, it’s always slightly thicker and the pasta ribbons you can make from it include sagne ritorte and taccune.
Step 1: Weigh out your ingredients
Allow 45-50g tepid water for every 100g semola rimacinata (semolina flour). Incidentally, the volume of the water is the same as the weight: 45-50ml, but scales are more accurate than measuring jugs. Add 4g (1tsp) salt to a litre warm water. Salt is not there for flavour; it helps to make the gluten strands slide along one another better.
Step 2: Mix them together
Either use a bowl or heap the flour onto your board. Using your fingers, make a well and pour in the amount of water you need. Mix the flour into the water, making sure you mop up all the excess flour.
Step 3: Knead the dough
Knead the dough, as described for the egg pasta (see above), for 5 minutes. You want a dough that is silky and not sticky to the touch. It won’t have the soft pillowy feel of egg-based pasta dough, but it will feel nice and plastic – and you can use it immediately, there’s no need to leave it to rest. If you knead the dough for longer, it will develop some elasticity and then you will have to let it rest for 20 minutes or so.
Step 4: Shape the dough
Roll the dough if necessary (lots of southern Italian pasta shapes don’t require the dough to be rolled out). Keep the dough covered while you are making the pasta shapes to stop it drying out.
Luigia’s manata with chickpeas
For 6 people
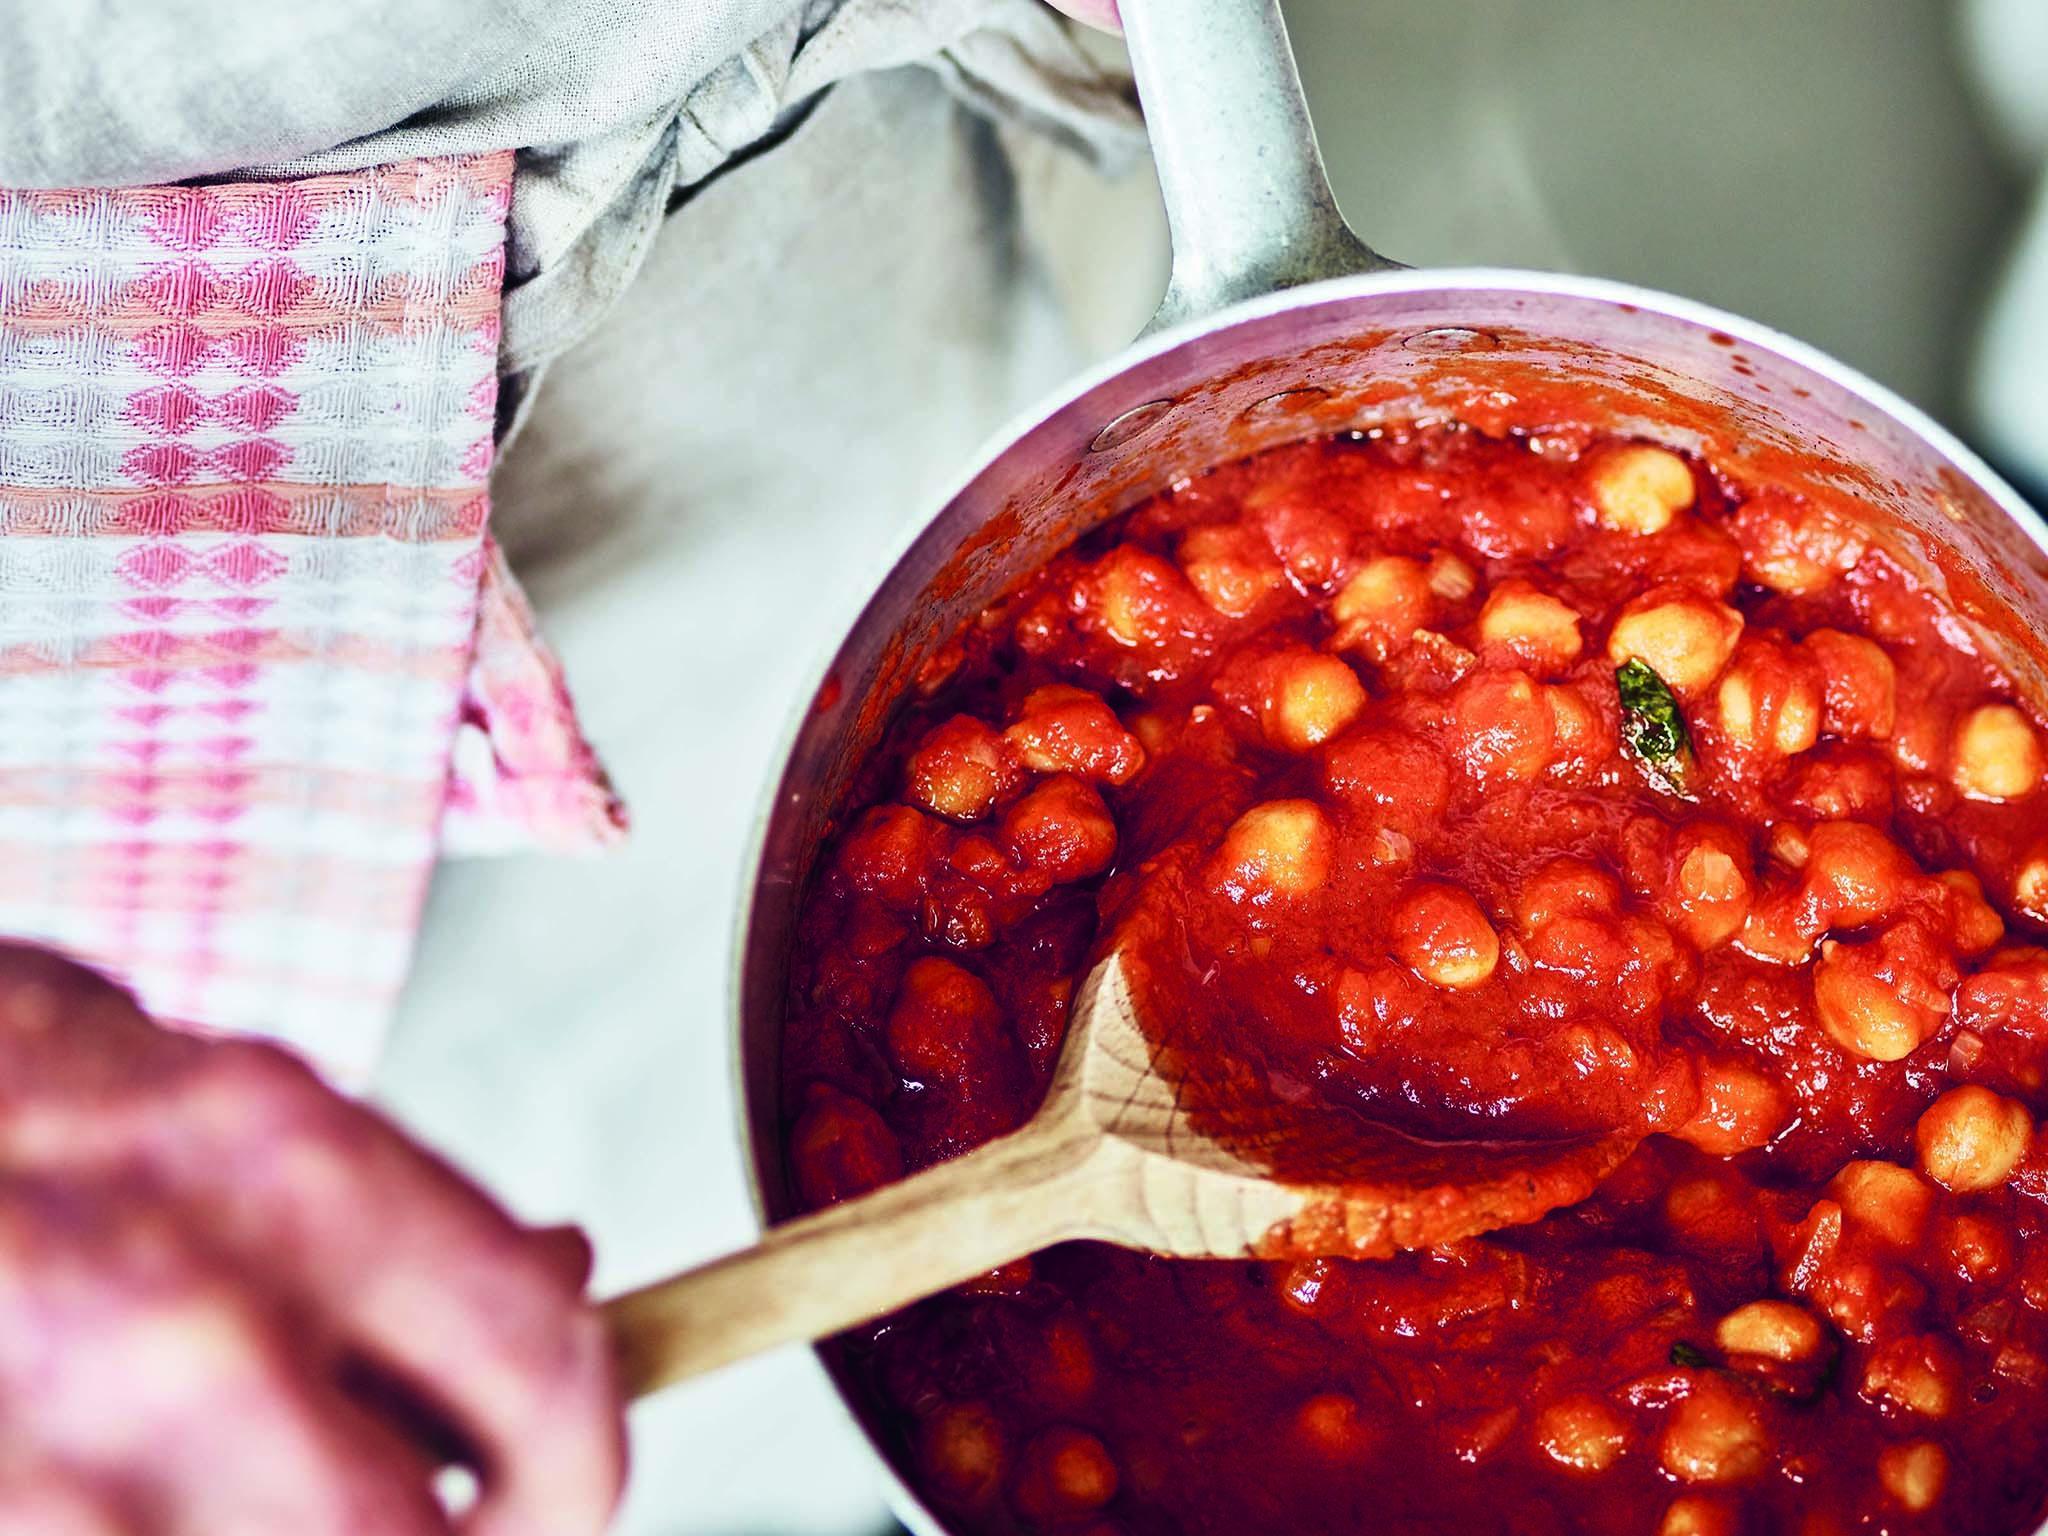
Manata is a ribbon pasta, found in the Castelmezzano area of Basilicata. It uses a very interesting method to make it, which doesn’t involve rolling out a sfoglia first. Its name changes depending on where you are in southern Italy – down the road in the village of Ginestra it’s called dors in the local dialect. Luigia has a ready laugh and isn’t at all fazed being filmed in a local restaurant. She says: “I was part of a large family and we had to make pasta – we couldn’t afford to buy it.” Squeezing and stretching the dough, she creates a kind of short tagliatelle, which she then serves with a simple chickpea and tomato condiment. “This is a typical way to serve this pasta,” she says.
For the pasta
400g semolina flour
Pinch of salt
180-200ml water
For the chickpea and tomato sauce
3-4tbsp extra virgin olive oil
1 onion, chopped
300g cooked tin or jarred chickpeas
300g passata
1tsp salt
Handful of fresh basil leaves
Extra virgin olive oil, to drizzle
Make the durum wheat pasta dough as described. The easiest way to describe how to make manata ribbons is to refer you to Luigia’s video on the Pasta Grannies channel on YouTube. But if you don’t have access to the Internet, here goes...
Once your dough has rested, press it into a slipper shape. You want to make a ring of pasta: use a sharp knife to slice down the middle to create a horizontal slit all the way through the dough. Using the palms of your hands, gently widen the slit and rotate the dough round, shaping it into a ring. Keep rolling and working the dough around the circle, to increase its circumference and thin out the dough. Keep going until you have a smooth rope which is about 1cm in diameter. Then, channelling your childhood rodeo cowboy dreams, loosely loop the rope around one hand about six times.
Hold the coiled rope in both hands, palms up. Decide which is your squeezing hand and place that in front of what is now your pulling hand. Use your pulling hand to stretch the pasta towards your body, feeding it through the hand in front, which squeezes it as it passes through. Make sure to keep your pasta ropes well floured.
The strands will increase in length and once they are long enough, you can loop them over your hand again a few times and repeat the process. Stop when the ribbons resemble tagliatelle. (In Abruzzo, by the way, this process results in a pasta called maccheroni alla mugnaia, which stays as one long loop.) Slice the ribbons into 10cm lengths. Leave them spread out on the board or tray to dry a little. To make the chickpea and tomato sauce, heat the oil in a saucepan over a medium heat and sauté the onion until it is soft; this will take a good 5 minutes. Add the chickpeas, passata, salt and basil leaves and give everything a good stir. Leave the sauce to simmer for 10 minutes, until it has thickened slightly. Bring a large saucepan of water to the boil, add some salt and return to the boil. Throw the pasta ribbons in and cook for a few minutes – check one to make sure it’s cooked. Drain and add the pasta to the chickpeas. Drizzle a little extra virgin olive oil over everything before serving.
Alba’s tagliatelle with ragù
For 4 people
I expect you have your own recipe for spaghetti bolognese. Good old “spag bol” is a popular dish everywhere but Italy – where it’s unheard of, because everyone knows meat ragù is served with tagliatelle. So, when Vincenzo Vernocchi, a talented winemaker, got in touch saying his nonna makes amazing tagliatelle al ragù, we jumped at the chance to visit her. Alba greeted us wearing a deep blue, subtly brocaded dress and Versace trainers, drop earrings and a turquoise necklace. She has always been interested in fashion; her first job was working in a tailor’s shop, like so many young women of her age. And, at 86 years old, she is a fab example of comfy chic. Alba’s career in fashion didn’t come to pass as she got married at 16 and, to begin with, worked with her husband on his farm. They ran an agriturismo, serving food, which became so successful that they left farming behind to concentrate on the restaurant, just outside Cesena, a town close to the Adriatic coast.
While making this dish, Alba shares several suggestions: first, like most cooks in the area, she uses milk in the ragù, as it adds a touch of creaminess and sweetness and also balances out the acidity of the tomatoes. Next, she recommends using a tin of whole tomatoes and blitzing them to make a passata – the producers have to use their undamaged, unblemished tomatoes for this, making it a better-quality product. As for your pasta, if it’s a little bit soft, then sprinkle grated parmigiano over the sfoglia to stop it from sticking when you roll it up. Alba doesn’t like too much surface flour on her pasta.
There is, in fact, an official recipe for tagliatelle alla bolognese that was registered with the Bologna Chamber of Commerce in 1972. This instructs cooks to add a half glass of red wine; Alba doesn’t, but it’s certainly an option, so have included it in this recipe. Ingredients can vary slightly, but long slow cooking is the key to a good ragù.
For the pasta
400g 00 flour or plain flour
4 eggs
For the ragù
150g unsmoked pancetta, minced
1 carrot, finely diced
1 celery stick, finely diced
1 onion, finely diced
200g ground beef steak
200g pork mince
A glass of red wine (optional)
400g good-quality tin whole tomatoes (eg san marzano or cherry)
1tbsp tomato puree
150ml whole milk
1 bay leaf
Freshly grated nutmeg (to taste)
Salt
To serve
Grated parmigiano reggiano
Make the egg pasta dough as described. Once you have made your sfoglia, leave it for 5 minutes to dry a little, before rolling it up like a carpet and cutting across the pasta to create folded over ribbons about 7mm wide. If you want to make nests, for easier handling, then take 4 rolled ribbons at a time, shake them out, drape them over a finger and grab the 8 ends. Keep holding them and wrap the strands around your hand so you end up with a nest and the ends are on the inside. This way, the ends don’t dry out as quickly.
Take a casserole or deep sauté pan and heat it over a medium flame. Add the pancetta and fry it so the fat is released. Sauté the carrot, celery and onion, until the mixture is soft – it will take around 10 minutes. Then add the rest of the meat. Brown it, stirring frequently until the meat has broken up and looks like it’s abandoned all hope of becoming a burger. If you want to add wine, do so now and let it evaporate. Blitz the tomatoes with a hand-held blender and pour this into the meat mixture. Stir in the tomato puree, half the milk, the bay leaf and plenty of freshly grated nutmeg. Let the mixture simmer very gently, adding more milk when necessary, for a couple of hours. At the end, when you push a spoon through the ragù you should briefly see the bottom of the pan.
Bring a large pan of water to the boil, add a generous couple of teaspoons of salt and return the water to the boil before heaping in your pasta. Give it a stir and test your pasta for doneness after 1 minute. It should have cooked within 2 minutes.
Drain it, return it in the pan and stir through the ragù. You want the ragù to coat the pasta; resist the urge to drown your tagliatelle in the sauce. Plate up and add a final flurry of parmigiano reggiano over each serving.
Gaia’s culurgiones with tomato sauce
Makes 50 culurgiones, enough for 10 people
Our brief for finding women (and men) for the Pasta Grannies YouTube channel is they have to be over 65. But we make exceptions, and Gaia is one of them because she is such a whizz at making culurgiones. Only, in her village of Escalaplano, in southeast Sardinia, they are called culixionis a spighetta. “Spighetta” refers to the way the ravioli is closed, making it look like an ear of corn. The spelling, size and fillings vary from village to village, but culurgiones always include mashed potato. They are made on special occasions, like the end of harvest and the Day of the Dead (1 November), and they are given to others as a symbol of friendship. “I started to make pasta when I was really young, like five years old,” Gaia tells us, “with my grandmothers, nonna Massimina and nonna Maria, who are both from Escalaplano. They encouraged me to play with the pasta, like it was a game, and I thought it was really good fun, especially since I got to play with them, too. When I was 19, I became really interested in learning my grandmothers’ pasta secrets, so I asked nonna Massimina to teach me. She always said, ‘Close the culurgiones with a very fine and dense seam, almost as though you are sewing by hand, with a lot of patience and commitment.’
“And she was thrilled when she saw the Pasta Grannies video with me – she loved that her teaching was reaching the wider world. Unfortunately, she passed away in September 2018, and that’s why I want to dedicate this page in her memory. Thank you, nonna Massimina, for all your love and inspiration.”
This recipe makes about 50 culurgiones – enough for 10 people if they are not going to have a second course. They freeze well though – cook them straight from frozen – and you can also halve the quantities if you wish.
For the pasta
1kg finely ground semolina flour
450-500ml water
1tbsp extra virgin olive oil
2tsp salt
For the tomato sauce
1 onion, diced
3-4tbsp extra virgin olive oil
1kg passata
20g fresh basil leaves, plus extra to serve
½tsp salt
For the filling
1kg potatoes
100g aged pecorino, finely grated
200g fresh pecorino, finely grated
200g fresh soft goat’s cheese
4tbsp freshly chopped mint
1 egg, beaten
2 garlic cloves, minced to a pulp with a pinch of salt
4tbsp extra virgin olive oil
Pinch of powdered saffron (optional)
Make the durum wheat pasta dough as described. Not everyone puts oil into the dough, but for nonna Massimina it was very important. Set it aside to rest. Make the tomato sauce by softening the onion in olive oil in a saucepan, then adding the passata, whole basil leaves and salt. Leave the mixture to simmer for 30 minutes and remove the basil at the end of cooking. While the sauce is cooking, roll out the dough to about 2mm thick. Use a cookie cutter to make circles in the dough, 8cm in diameter. Keep them covered with just-damp tea towels to stop them from drying out.
To make the filling, peel, quarter and boil the potatoes. When cooked, after 15 minutes or so, drain them thoroughly, then mash them. Once the potatoes have cooled to lukewarm, thoroughly mix all the filling ingredients together.
Add a walnut-sized dollop into the centre of each pasta circle. Cup one in your left hand (if you are right-handed) and “sew” the seam across the top, starting at one end of the half-moon with the tips of your thumb and forefinger of your other hand. It is an alternate pleating motion, bringing one side over the other (watching Gaia do it on the video is very helpful to understand what’s happening).
Remember, it will taste the same even if you get it wrong the first few times you try. Don’t worry if some filling creeps out towards the end of the process either – it means you have created plump culurgiones.
Bring a large pan of salted water to the boil and cook the culurgiones in batches. Once they bob to the top – which will take around 5 minutes – you can scoop them out and dress them in the tomato sauce and basil leaves.
‘Pasta Grannies: The Secrets of Italy’s Best Home Cooks’ by Vicky Bennison (Hardie Grant, £20) Photography Emma Lee
Subscribe to Independent Premium to bookmark this article
Want to bookmark your favourite articles and stories to read or reference later? Start your Independent Premium subscription today.
Join our commenting forum
Join thought-provoking conversations, follow other Independent readers and see their replies